Warranties and manuals
We’re a highly collaborative and supportive team, coming together on every project to ensure our clients get the very best result.
Our Mission
Build the best product that creates the most value for our customers, use business to inspire and implement environmentally friendly solutions.
Our Values
We strive to go above and beyond for our clients no matter the challenge. We aim to deliver our very best work every single day across our services.
Geyserobot GR5 Instructional Video
Geyserobot Geyser Timer Instructional Video
Geyserobot Manual V1.00
Design Rationale:
Circulating solar heaters can enhance heat loss due to circulating water/coolant, potentially leading to leaks. Therefore, a novel and easily maintainable solution was needed. Using solar panels (PV panels) to heat the geyser directly offers numerous advantages and greatly simplifies geyser subsystem maintenance, especially from a plumbing perspective. This approach prevents secondary leaks and eliminates the need for special equipment or attachments on the geyser, alleviating concerns about geyser warranties and homeowners’ insurance. Furthermore, converting an existing installation to solar is effortless – just install the Geyserbot in line with the existing geyser wiring. The Geyserobot is designed and produced locally for the South African market, complete with local service centers and spare parts supplies.
What is a Geyserobot ?
A Geyserobot is an electronic device that uses solar energy as its renewable energy component to provide hot water. If there is a shortage of solar power, like on a cloudy day, the Geyserobot can be programmed to heat the geyser to a preset temperature using the available grid power. It can also manage grid energy as required by the user. The Geyserobot has its own very accurate temperature probe to measure the state of the water in the geyser. These operating temperatures are fully programmable by the user. Additionally, the Geyserobot has a built-in real-time clock for programming the three built-in timers provided.
Feature list:
- No extra plumbing installation or modifications required.
- No modification of the waterways or geyser element is necessary.
- No refrigerant leakage or maintenance issues to worry about.
- Utilizes the standard geyser element supplied by the geyser manufacturer.
- Only requires electrical connections to the geyser, with no impact on the manufacturer’s warranties.
- High efficiency is achieved when running on solar power.
- Can utilize grid energy when solar power is not available.
- Easily upgrade your current geyser to solar without any hassle.
- No need for additional external timers.
- The data port supplies impedance-protected power to displays and peripherals.
Optional features:
- Offers full remote management and diagnostics capabilities.
- A single user can view and manage multiple geysers.
- The grid can be remotely switched on and off.
- The field software is upgradable to accommodate new functions and hardware.
- Features a compatible MQTT (IOT Compatible) feed for seamless integration into a home automation system.
- Includes a comprehensive RMS measurement module.
- Equipped with a data bus interface for water and gas meters.
Overview of installation:
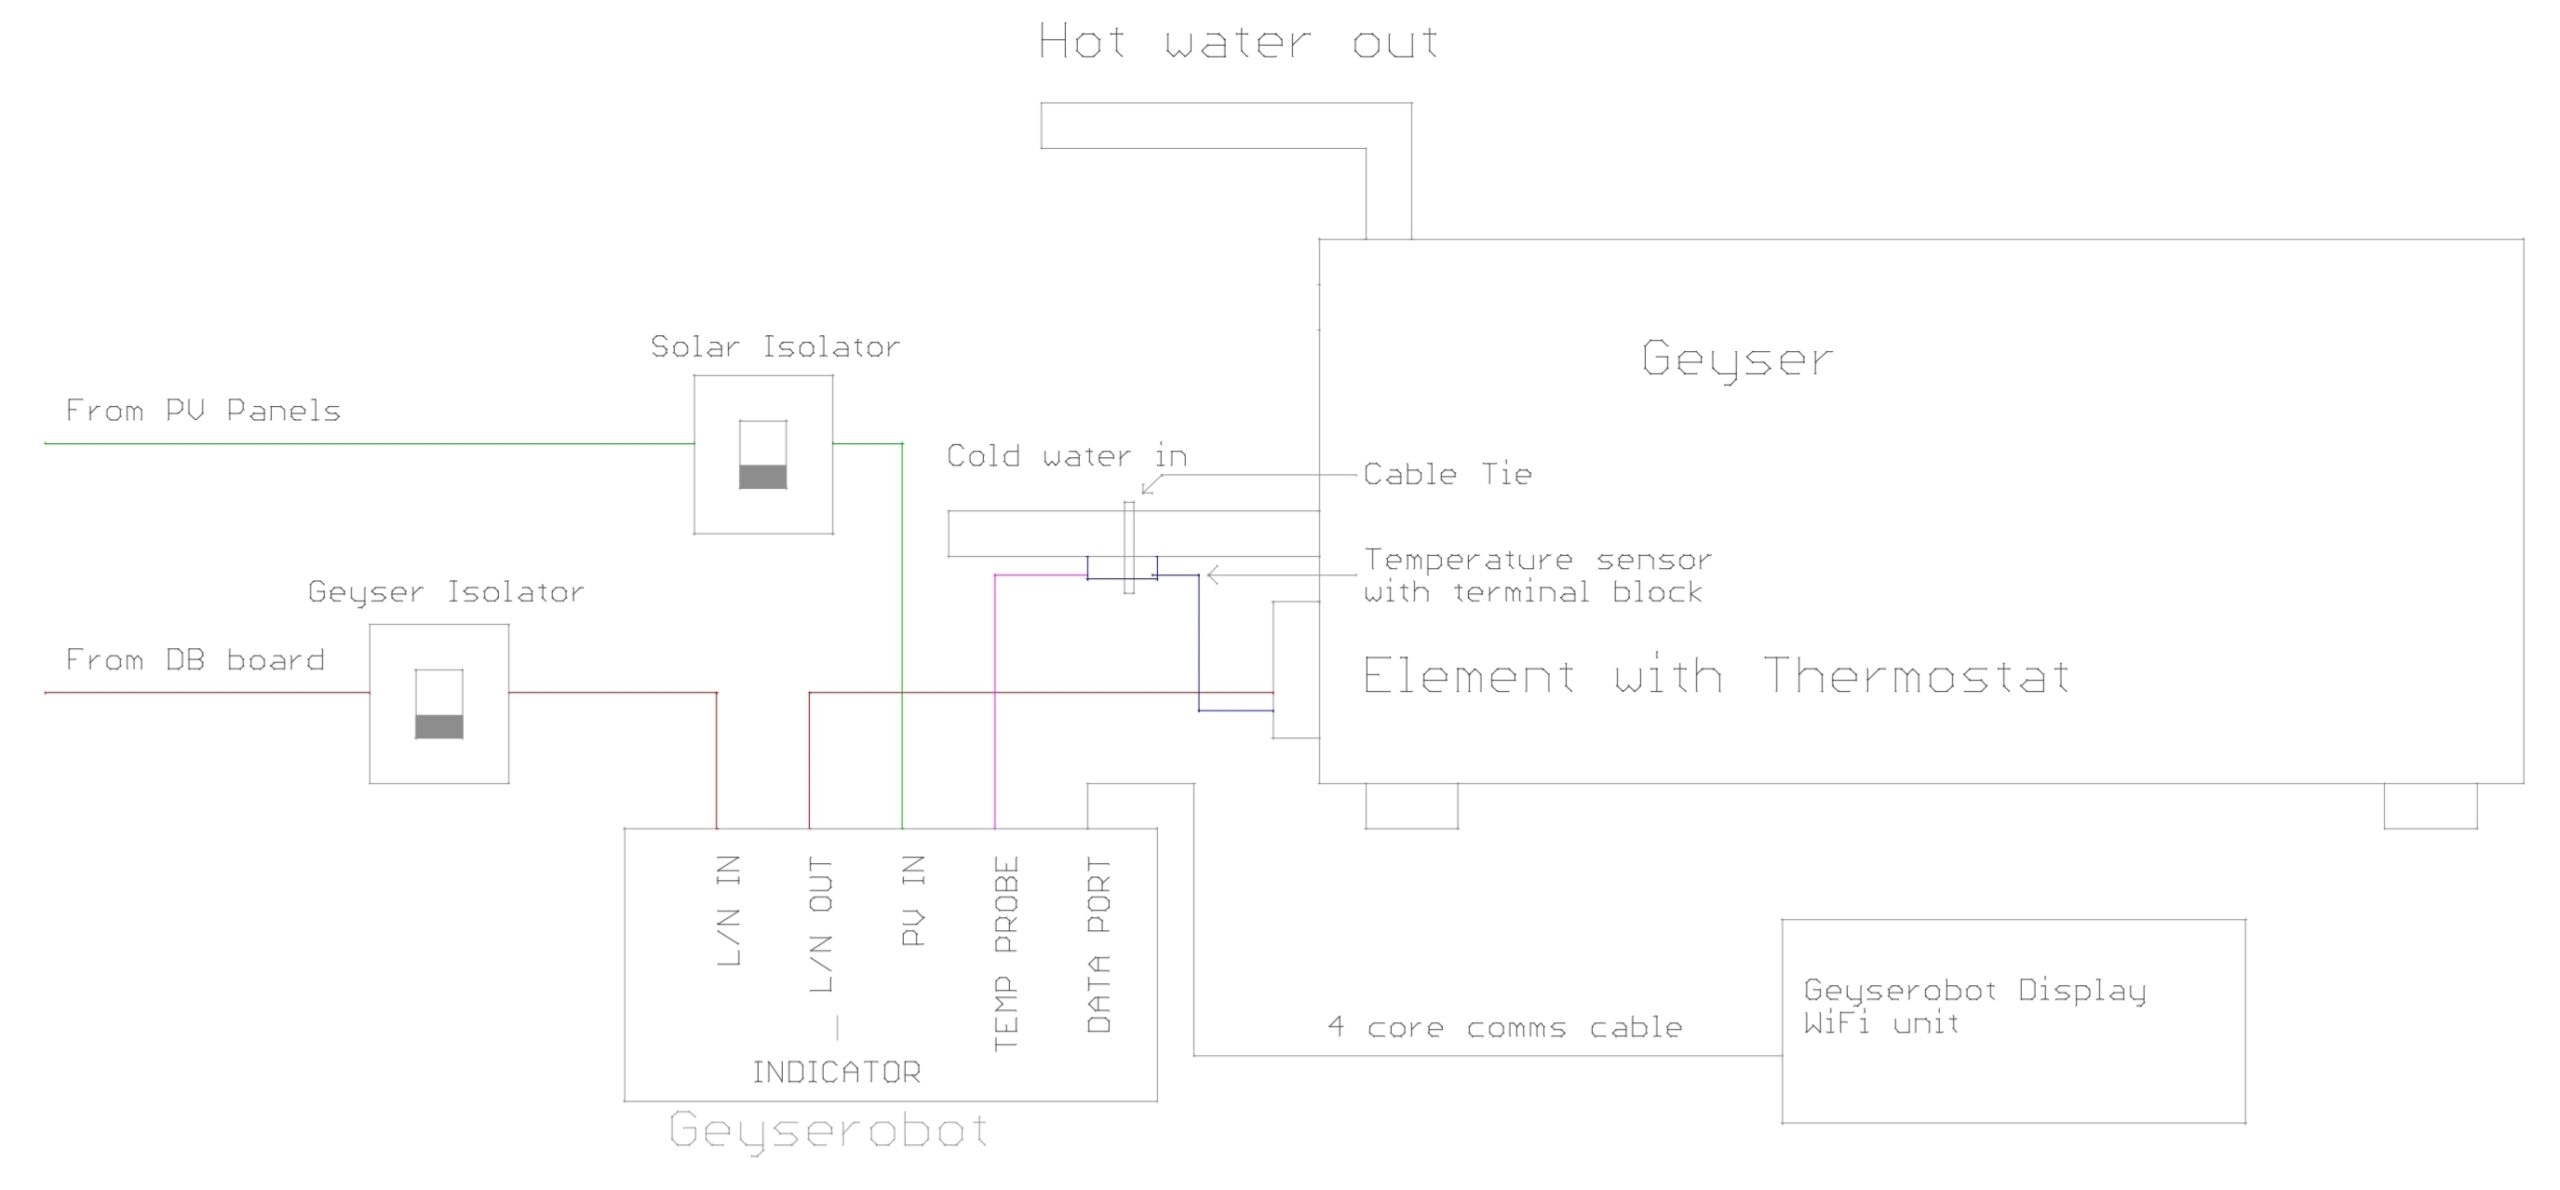
Installation procedure:
The Geyserobot has 4 connection headers for external connections.
The 7-way heavy gauge connections are used for the grid, geyser, and solar panels.
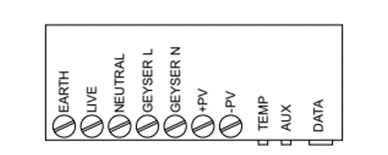
The Geyserobot has 4 connection headers for external connections:
- The grid is connected to Earth, Live (L), and Neutral (N).
- The output to the geyser is connected to GEYSER L, GEYSER N, and the geyser earth is linked to the Geyserobot’s earth tag.
- +PV is the DC solar input, and -PV is the DC solar input negative line.
- The supplied temperature probe is plugged into the TEMP socket, and AUX is reserved for special purposes.
- DATA is the RS485 bus used by the display, inverter, water meter, and other equipment.
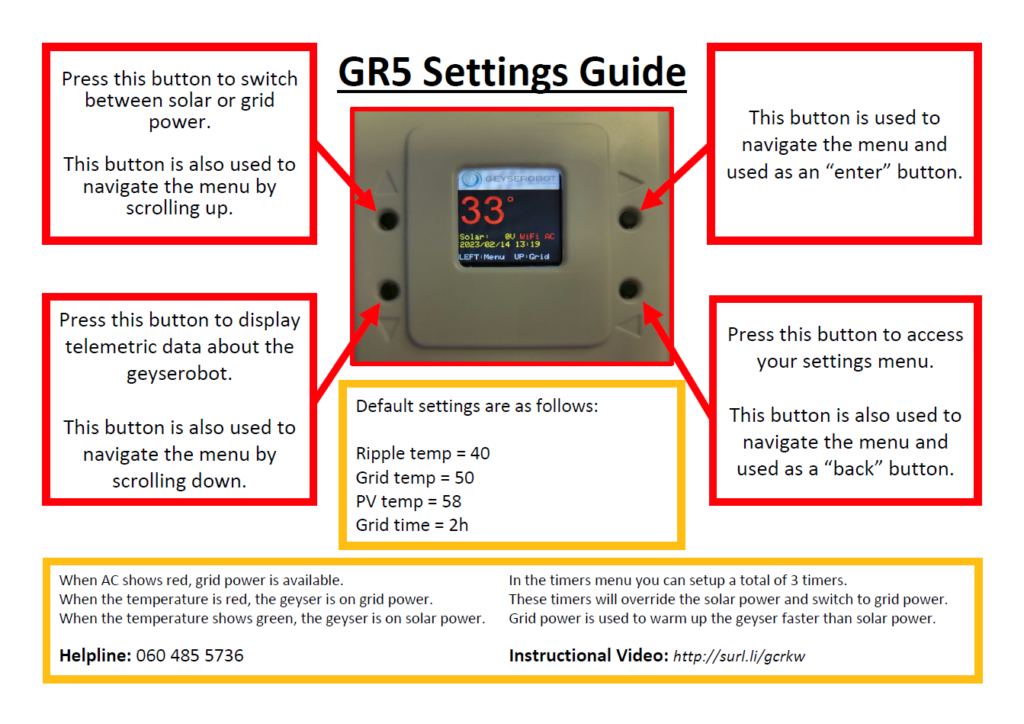
Display Overview:
The Mini Geyserobot LCD display utilizes state-of-the-art LCD technology, providing a highly clear and visible display, even from a distance.
Layout of the Mini Geyserobot LCD display.
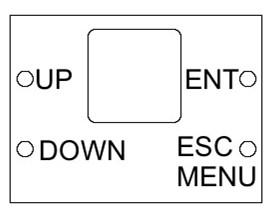
When the LCD has entered power save mode, pressing any button for about 0.5 (half a) second and releasing it will restore the display’s power.
To access the menu, press and hold the lower-right button (ESC/MENU) for 2 seconds and then release it.
To navigate the menu, use the UP or Down buttons to move the cursors up and down.
To select an option within the menu, use the ENT or enter key.
To go back to a previous menu item, press the ESC escape key.
To exit the menu and return to the temperature display, the user should select the “Exit” menu item.
Display contents will be:
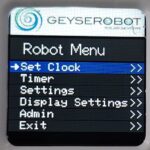
Setting Real-Time Clock of the Geyserobot:
To set the real-time clock of the Geyserobot, follow these steps:
- Navigate to the “CLOCK” option in the main menu.
- Use the arrow keys (UP or DOWN) to move the blue bar over the “Clock” option.
- Press the ENT (enter) key to select the “Clock” option.
Once you’ve selected “Clock,” the following menu will appear, allowing you to input the desired time for the Geyserobot’s real-time clock. Follow the on-screen instructions to set the correct time.
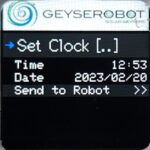
To change the date and time on the Geyserobot, follow these steps:
- Navigate to the “DATE AND TIME” option in the main menu.
- Use the arrow keys (UP or DOWN) to adjust the date and time settings until they are correct.
- Once the date and time are correct, select the “Send to Robot” option.
- Press the ENT (enter) key to upload the changed date and time to the Geyserobot.
Upon completing these steps, the Geyserobot’s date and time settings will be updated with the new values you selected.
Changing any of the 3 system timers.
TIMER:
Us this option to set the timers.(Press ENT while blue bar is over Timer)
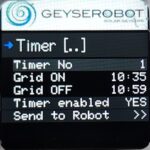
Timer No:
Select this option to change the Timer in the range from 1 to 3.
Grid ON:
Set the time for grid power to turn on. Please note that when the grid is available, it will be switched on when the time is between this value and the Grid OFF value.
Grid OFF:
Set the time for grid power to turn off. Please note that when the grid is available, it will be switched off when the time is between the Grid ON and this value.
NOTE: The Grid OFF time cannot be smaller than the Grid ON time.
Timer Enabled:
Choose either YES or NO to enable or disable this timer.
Send to Robot:
Select “Send to Robot” to save the parameters to the permanent storage area of the Geyserobot.
General settings:
Settings:
Selecting settings (Press ENT while blue bar is over Settings) will bring up the settings menu.
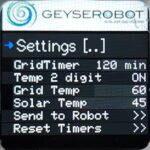
GridTimer:
The GridTimer is used when the user wants to turn on the geyser using the grid for a specified duration in minutes. To activate this function, press and hold the UP button for 3 to 5 seconds.
Temp 2 Digit:
Set this option to “ON” to display temperatures as whole numbers (e.g., 55⁰). Setting it to “OFF” will display the geyser temperature as a decimal fraction (e.g., 55.6⁰).
Grid Temp:
Whenever the timer or GridTimer is active, the grid will be enabled to reach this temperature. The hysteresis value is set at 2 degrees C (The GR5 will only switch on the grid once the geyser temperature reaches 2 degrees less than the setting).
Solar Temp:
Whenever Solar power is present, the geyser will be heated to this temperature. The hysteresis value is set at 2 degrees C (The GR5 will only switch on the grid once the geyser temperature reaches 2 degrees less than the setting).
Min Temp:
If Grid supply is available and the geyser temperature drops below the Min Temp setting, the Geyserobot will automatically use the Grid to top up the geyser temperature to this value. If the user does not need this function, the recommended setting would be 18 °C.
Reset Timers:
Do not select this option; only use this under the direct supervision of a Geyserobot support agent.
Send to Robot:
Select “Send to Robot” to save the parameters to the permanent storage area of the Geyserobot.
Display Settings:
Selecting Display Settings (Press ENT while blue bar is over Display Settings) will bring up the display settings menu
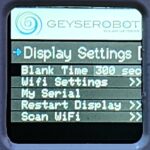
Blank Time:
The “Blank Time” refers to the duration in seconds that the display will remain active before being automatically blanked to save power.
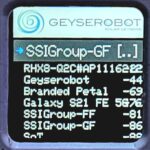
Wi-Fi Settings:
This option takes you to the WiFi setup screen. To access the available WiFi SSIDs, move the cursor down to “(No SSID set)” and press the ENT key. A screen will display all the presently available WiFi SSIDs. Note that the closer the number is to 0, the better the signal quality; thus, a signal strength of -40 is preferred over a signal strength of -80.

Pass:
The “Pass” option displays the currently selected WiFi password. To change the password, highlight it and press ENT. A set of square brackets [ ] will appear. Use the UP and DOWN keys to select the correct character, and then press ENT to move to the next character.
To move backward, press the ESC button. After entering the last character, press ENT twice. The cursor will return to the menu mode. Next, highlight the “Save Credentials” entry and press ENT to update these parameters. Return to the main menu and observe the WiFi symbol. Once a WiFi connection is established with the router, the “Wi” in WiFi will turn green.
The display will now communicate with the Geyserobot IoT server. When this connection is established, the “Fi” of the WiFi will turn green as well. The Geyserobot can now be managed from the Geyserobot website.
Please note that once the password is saved to permanent memory, it will not be displayed again after the unit is powered up.
Save Credentials:
Select “Save Credentials” to store the password and SSID to permanent memory. The display will not show any message confirming the operation’s completion.
Del Credentials:
Select “Del Credentials” to delete all the saved credentials. The display will not show any message confirming the operation’s completion.
My Serial:
Selecting this option will show the Geyserobot’s serial number and the access code, enabling you to add the Geyserobot to the https://www.geyserobot.net website.
Restart Display:
The “Restart Display” option performs a hardware reset on the display. Note that this action does not reset the Geyserobot itself.
Scan WiFi:
Select “Scan WiFi” only if the expected SSID does not appear on the SSID list in the WiFi Settings screen. After selecting this option, wait for at least 1 minute before entering the WiFi Settings.
Admin Settings:
Select “Settings” (Press ENT while the blue bar is over Settings) to access the display settings menu.
Enter Pin [..]
Password
Proceed
Cancel
Enter the Admin Access Code:
Remember, the admin access code is unique to every Geyserobot. Input the admin access code to proceed.
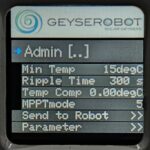
Admin:
The admin menu is exclusively for installers and authorized service personnel.
Min Temp:
If Grid supply is available and the geyser temperature falls below the Min Temp setting, the Geyserobot will automatically use the Grid to raise the geyser temperature to this value. For users who don’t need this function, the recommended setting is 18 °C.
Ripple Time:
When the Geyserobot switches to the Grid to bring the geyser to the Minimum Temperature, this is the minimum amount of time that the Geyserobot will keep the Grid on before checking the temperature of the geyser.
MPPTmode:
This is a system parameter, do not change at all.
Parameter:
This is a system parameter, do not access unless directed by support personel.
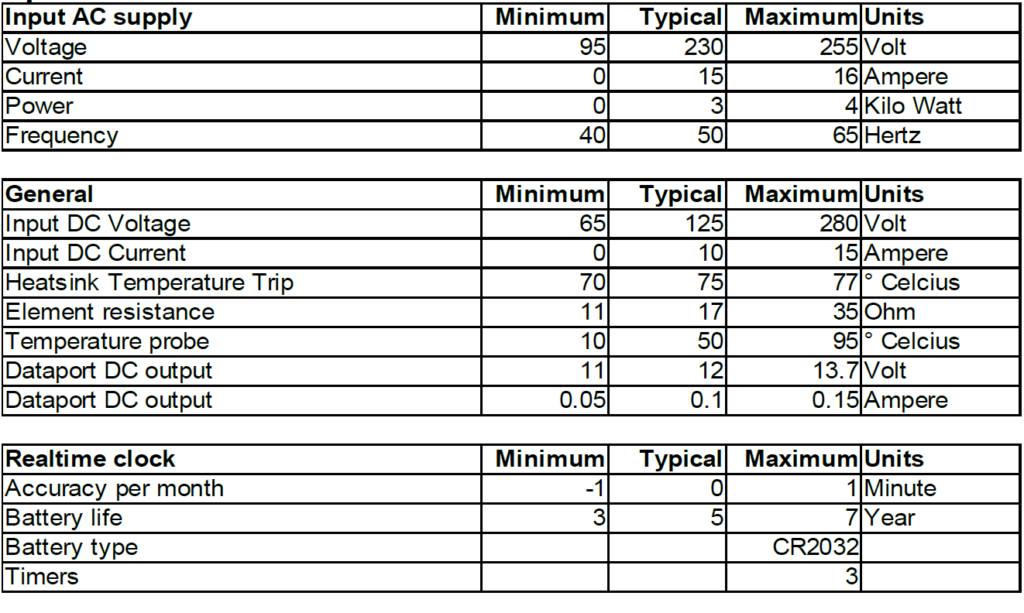
Specifications:
Error Codes:
The display will show error codes:
Error code 99, the Geyserobot detected a thermistor short circuit condition.
Error code 98, the Geyserobot has detected an open circuit thermistor.
When the Geyserobot detects an over temperature of the internal components it will flash the indicator lamps alternatively red and green. Once cooled down the Geyserobot will restart operation automatically.